Every car on an automotive assembly line is built from thousands of parts, and each one has to reach the right workstation at the right time. Many plants handle this with kitting carts, trolleys pre-loaded with the exact bolts, clips, and brackets needed for each build. If even one part is missing when a cart arrives, the operator has to wait, and the line can slow down.
Making sure nothing is missing starts earlier, at a sorting station. Mixed parts arrive on a conveyor, and an operator sorts them into the right bins and keeps count. Once a bin reaches its target, say 10 nuts, it’s packed and sent on to the next station. In many plants, this work is still done by hand.
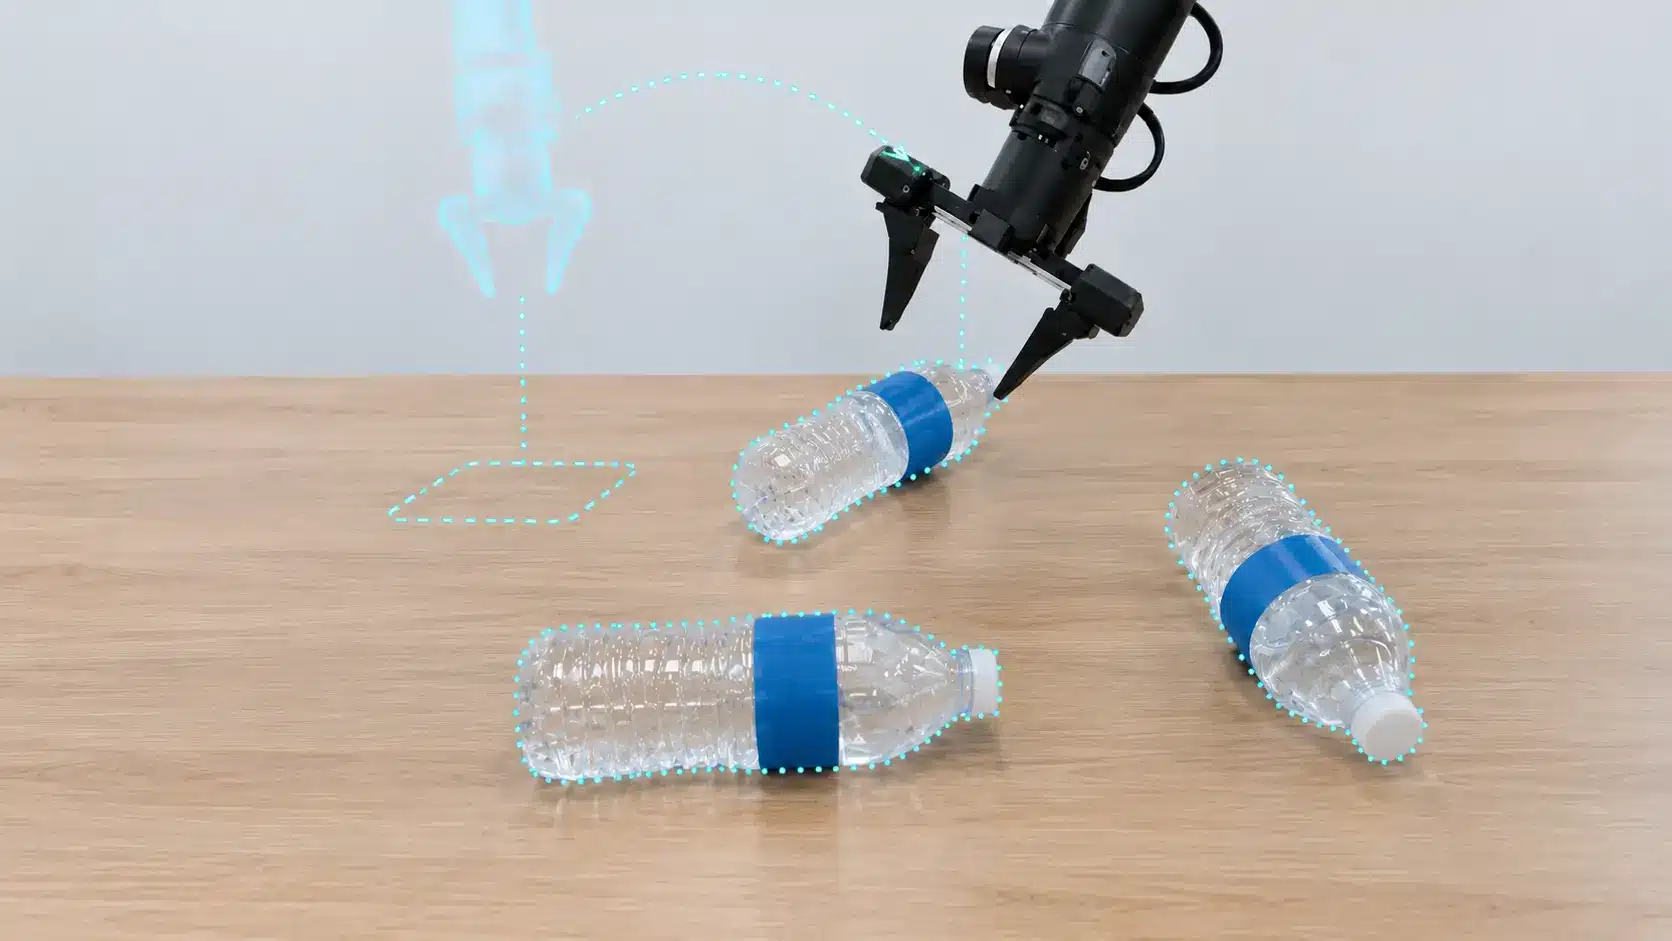
A pick and place robot can take on this task. It uses a robotic arm to pick up an object from one spot and place it somewhere else, and it’s already a familiar part of automotive assembly line automation.
However, moving a bolt or bracket from one place to another is the easy bit. The robot also needs to decide which part to pick up, how to grip it, and which bin it belongs in. That kind of judgment is hard to write down as fixed rules, which is what makes robotic sorting difficult to automate.
So, rather than relying on rules for every situation, a robot can learn from data. Through imitation learning, it trains on demonstrations recorded by people doing the real task, picking up the choices a skilled operator makes while sorting parts.
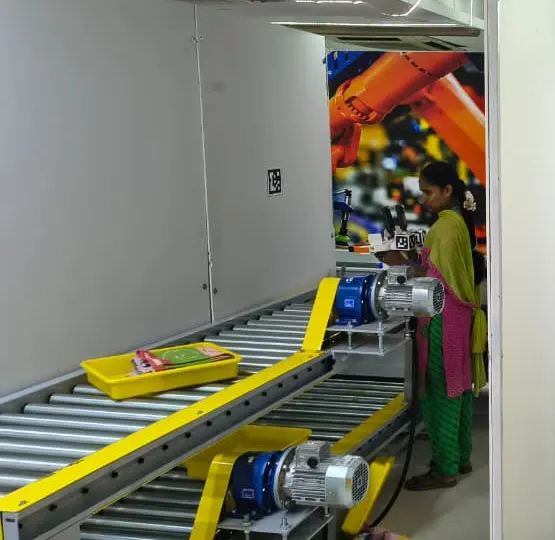
In this article, we’ll look at the sorting tasks a pick and place robot needs to learn, how handheld grippers capture that data, which automotive parts suit this approach, and where robot data collection can go wrong. Let’s get started!
Before we look at how a robot learns to sort parts, let’s break down the job itself. Getting parts ready for the next station usually comes down to three tasks.
Here’s what each task involves:
We saw the same tasks in our recent conveyor pick-and-place project. Operators picked warehouse items one at a time from a mixed tote, placed each one in its own tray, and then moved them from the trays into a wall of cubbies. Swap those items for bolts, clips, and brackets, and it’s much the same job on an automotive line.
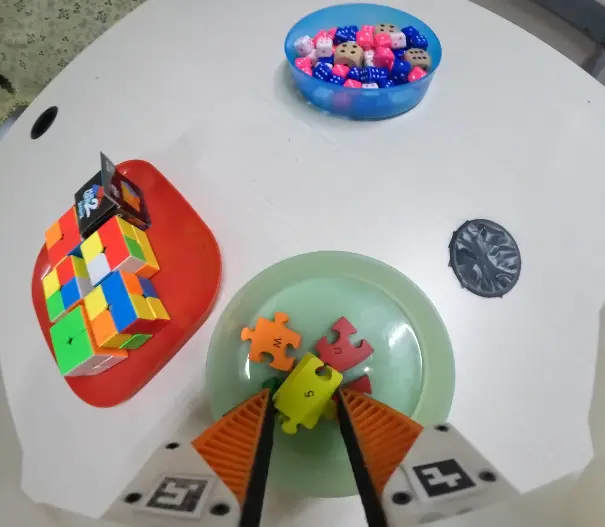
Each task also comes with small decisions the robot has to learn. For instance, an experienced operator might grab the easiest part first, move a bracket that covers a clip, or adjust their grip when a part sits at an awkward angle. They also never place two parts back-to-back in the same slot.
Operators make these choices without stopping to think, yet they’re exactly the decisions a robot needs to learn.
So how do you teach a robot to sort parts when the mix keeps changing? One option is to program it to follow fixed positions and instructions. This works well on production lines where parts arrive the same way every time, and the robot repeats the same task each cycle.
A high-mix line rarely has that consistency. For example, a rule might tell the robot to grip every bolt by its shank. But what happens when a bolt lands on its head or two bolts overlap?
A new vehicle model might also introduce a clip that looks almost identical to one already in use. Each variation needs another rule, and as the mix changes by shift and model, the exceptions quickly add up.
Simulation can speed up training, but virtual lines can miss details like an oily bolt slipping in a grip or glare reflecting off polished metal. These differences between a simulated environment and the real world are known as the sim2real gap.
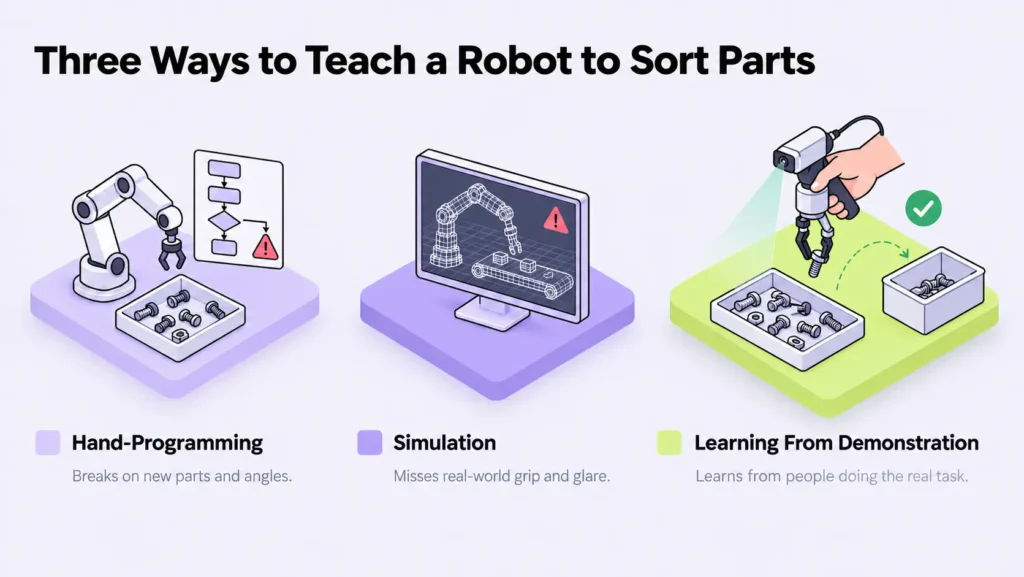
Imitation learning, also known as robot learning from demonstration, takes a different route. The robot learns from recordings of people performing the task, picking up the choices they make while handling different parts.
Those recordings also need to be accurate. If a movement is missed or the signals don’t line up correctly, the robot may learn the wrong action. That’s why capturing the data well deserves as much attention as the robot itself.
Next, let’s look at how these demonstrations are recorded. For a pick and place robot, the process can start with a handheld tool called a UMI (universal manipulation interface) gripper.
The UMI gripper matches the robot’s design, so the operator uses the same fingers and camera view as the robot will have. This makes it easier to transfer the recorded movements to the robot.
It also means teams can collect demonstrations at several workstations without needing a robot at each one. That’s the main difference from teleoperation, where an operator controls a real robot remotely to record each task, one of several data collection methods for physical intelligence.
There are two types of UMI grippers, depending on how much data a team needs. Here’s what each one records:
The footage and sensor data turn each demonstration into robot training data, showing both how the operator handles a part and how the gripper moves during the task. For tasks that need both hands, operators can use two grippers, one in each hand, with each gripper recording its own footage.
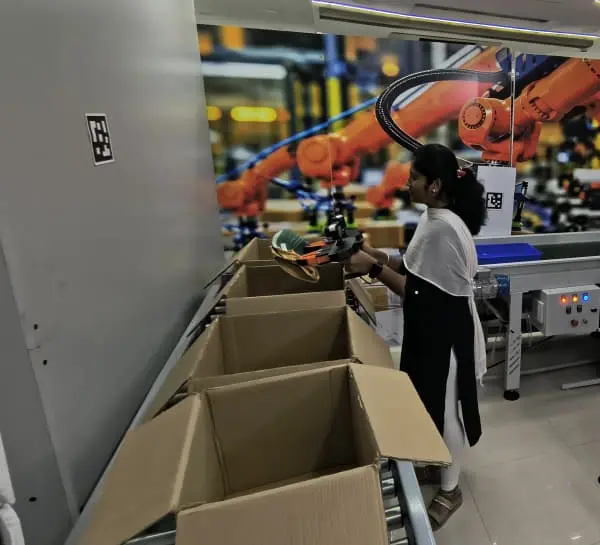
We place AR (augmented reality) markers, small square patterns the camera can easily detect, on either side of each workstation, next to where parts are picked and where they’re placed. During each cycle, the operator briefly points the gripper’s camera at the marker beside the input bin before picking, and at the marker beside the output tray after placing. We also place markers on the gripper so the camera can track them throughout the task.
These markers give the camera stable reference points to estimate the gripper’s position relative to the workstation, which helps with calibration and localization. By following the same marker placement standard in every session, teams can also keep recordings consistent across different demonstrations.
Capturing the footage and sensor data is only the first step. Before a robot can learn from these demonstrations, the two streams need to line up at every moment, and that’s harder than it sounds.
Film crews deal with the same problem when they record sound and picture separately. At the start of a take, someone snaps a clapperboard shut. That moment shows up in both the audio and the footage, giving editors a clear point to line them up.
UMI gripper recordings need a similar reference point. The camera and sensors keep their own clocks, which can drift apart during a session, so timestamps alone aren’t enough. Even a small timing difference can make a grasp appear in the footage before the sensor log records it.
To correct this, each session starts with a sync event. This is a clear moment, such as a defined gripper close or a visible cue, captured by both the camera and the sensors. Once that moment is matched across the two streams, the timing offset can be corrected for the rest of the session.
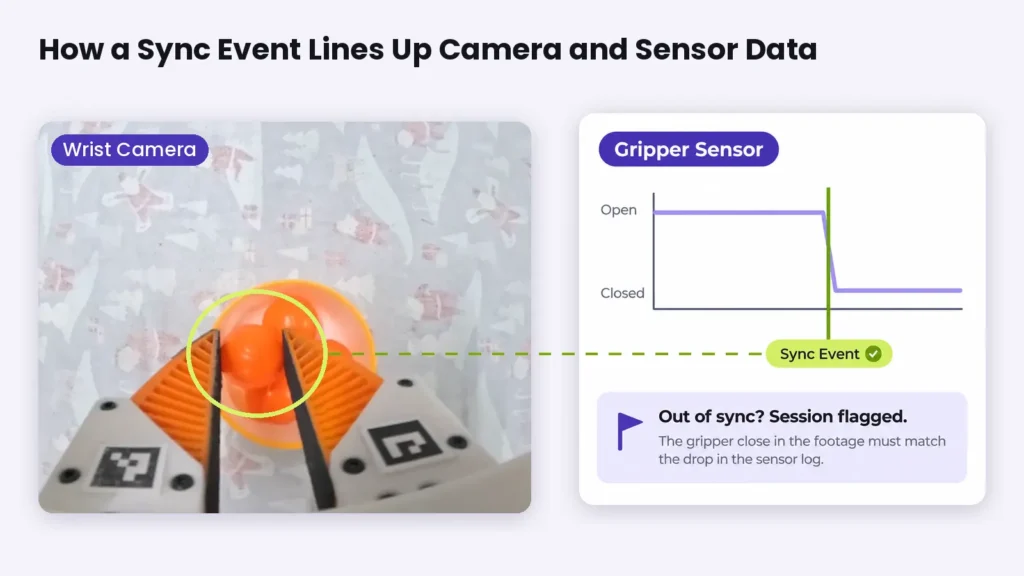
Matching the streams at the start still needs to be confirmed. For example, in our project, we checked every session to make sure the two streams stayed aligned. If the gripper close in the footage didn’t line up with the corresponding event in the encoder log, we flagged the session before the data reached training.
Markers provide another way to catch problems early. Because they sit in fixed positions around the workstation, software can scan the footage to confirm they stay visible throughout the task. A blocked or misplaced marker flags the recording before anyone spends time reviewing it by hand.
Clean data also depends on what’s being picked. Some automotive parts are easier to grip and record than others.
Rigid, mid-sized parts with matte surfaces, such as brackets, housings, and plastic connectors, are a good starting point for bin picking. Their shape and surface make them easier for a robot to grip and record than small, slippery, or flexible parts.
Small fasteners, gaskets, thin flat parts, and bagged or boxed items need more care. With standard fingers, a gripper might lift several nuts or bolts at once, or none at all, and flat washers leave little room for the fingers to get underneath.
Narrow or pointed fingertips help isolate a single fastener, while thin, flat-edged tips can slide under a washer. Presenting parts in a tray, sorted bin, or single-part feeder also helps by giving the gripper a predictable position instead of a pile to search through, making bin picking far more reliable. Even so, single-pick fasteners need a fingertip variant and a short validation run before collecting at volume.
Some parts fall outside what this method handles well. Oily parts slip and leave residue on the finger pads, shiny metal creates glare that makes markers harder to detect, and parts smaller than a few millimeters are too small to see or grip reliably.
Weight and flexibility set further limits. The sensor gripper has a 10 kg limit, which rules out brake discs, batteries, and wheels. Wiring harnesses, hoses, and cables bend and tangle, leaving no stable grasp point, so the data is noisy and the task is hard to define.
Now that we’ve looked at which parts are suitable for bin picking, let’s see where the demonstrations should be recorded. There are two main options for robot data collection, and each comes with its own trade-offs.
One option is to build a dedicated collection station that mirrors the production line. This gives the team control over the layout, lighting, and pace without interrupting production. The setup still needs to closely reflect the real line, though. If the environment is too different, the robot may learn to handle parts under conditions it won’t encounter later.
The other option is to collect data directly on the existing line. This captures the conditions the robot will face during production, but the team has less control over the setup and must work around production schedules.
One interesting example of a dedicated setup is dividing the process into separate stations, each assigned to a specific task. Operators can focus on one process at a time, while partitions help keep activity at neighboring stations out of the footage.
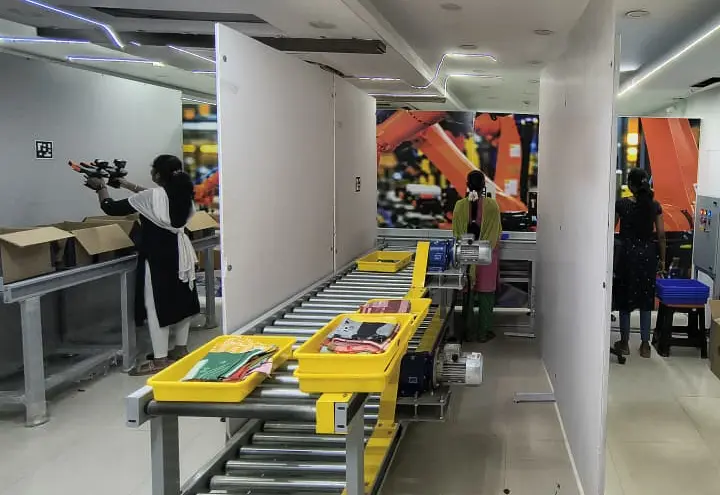
Whichever setup a team chooses, a few things need to be settled before recording begins. Here’s a closer look at each one:
Getting these details right gives the team a solid starting point. Some problems only show up once recording is underway, though, so it helps to know what to watch for during collection.
Many in-house robot data collection projects start with the gripper. A team builds or buys one, records a large batch of demonstrations, and assumes the main work is done.
The problems often appear during data review, when it may be too late to save those recordings. Collecting everything again adds both time and cost.
In our recent conveyor pick-and-place project, the gripper was the easy part. The more complicated work involved everything around it, from operator training and handling standards to quality checks and data delivery.
Upload bandwidth was the main constraint. We had to upload each day’s sessions before we could review them. We set up parallel upload lines and tracked progress daily to make sure every session was accounted for.
The sensor logs also needed separate checks. Some encoder logs showed finger position data that didn’t behave as expected, even though the footage looked normal. Reviewing the footage alone would have missed these problems, which is why keeping every sensor on time and validating its output is a core part of quality control.
Across the project, rejected sessions fell into a few common categories. File counts from the left- and right-hand grippers didn’t match, sensor logs were missing or poor, markers were blocked, missing, or misplaced, or footage had drifted out of sync. Some sessions also failed because an operator skipped the handling standard or an upload was dropped or interrupted.
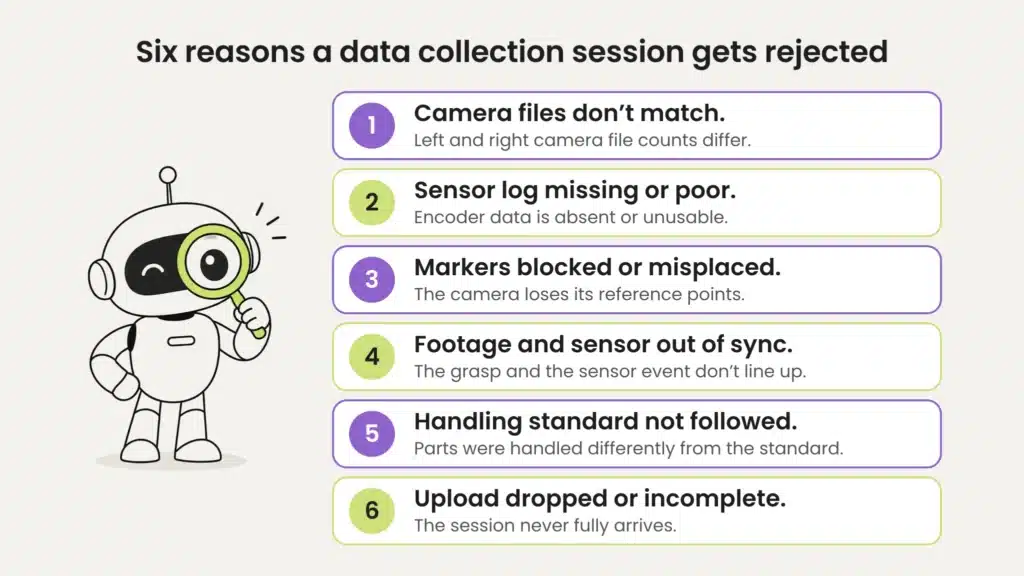
These problems are much easier to fix when they’re caught early. We ran quality checks on every session from day one, so we could address a blocked marker or faulty log the same day instead of discovering it weeks later.
Avoiding these mistakes keeps bad data out. The next step is making sure the right data goes in.
A pick and place robot learns to sort from episodes, short recordings that each capture one task from start to finish. The more complete and consistent those episodes are, the more useful the dataset becomes.
In a UMI gripper dataset, each episode shows the task from the gripper’s point of view, from the first approach to the final release. Even a simple pick, such as lifting a toy carrot from a dish, can provide useful training data when it’s recorded the same way across sessions.
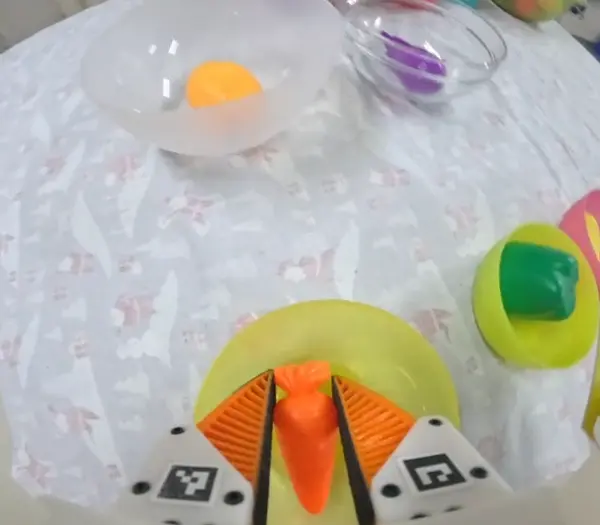
Here’s what that dataset needs to include:
When these elements come together, teams have physical AI data that is ready for training, with less cleanup needed before the next stage. This gives the project a stronger foundation as the robot moves from a pilot toward the production line.
At Objectways, we provide UMI gripper data collection for robotics teams and can take projects end to end, from station setup and operator training to session-level quality checks and data delivery. Beyond UMI, we also support teleoperation, egocentric, and depth data collection, along with data annotation, for robotics and physical AI projects.
Every kitting cart that arrives at a workstation ready for assembly depends on parts being sorted correctly. The job may look simple, but it involves small decisions at every step, from which part to pick first to how to grip it and where to place it.
A pick and place robot can learn these decisions from human demonstrations, but the quality of its sorting depends on the quality of those recordings.
A good place to start is a pilot focused on one sorting task and a set of parts ready for collection. This gives the team a chance to test the setup, review the recordings, and identify any issues before expanding to more parts and tasks.
If your team is exploring robotic sorting for an automotive line, Objectways’ data collection services can help you set up and run that first pilot. Get in touch to discuss your parts and tasks.
Pick and place is a task where a robot grabs an object from one spot, moves it, and sets it down in another. A pick and place robot handles this movement quickly and precisely, and it’s widely used for sorting, packing, and kitting on production lines.

Learn how adaptive robotics helps robots handle change, and why diverse training data, human corrections, and failure recovery make it possible.

Explore how robotics in logistics handles structured and unstructured tasks, from warehouse automation to truck unloading, and why real-world data is crucial.